For this week’s blog, we’re riffing on the titles of Kristy Turner’s beautiful vegan cookbooks, But I Could Never Go Vegan! and But My Family Would Never Eat Vegan!, to bring you a Valentine’s Day prep guide like no other. Whether or not you buy into the whole chocolate-teddy bear-roses Valentine’s schtick, it’s still kind of fun to spoil someone on this decadent day, whether it’s your gal pals or your partner of 40 years.
And what is more special than cooking for someone? Avoid the overpriced, overrated Valentine’s deals spamming your inbox and make something from the heart. Our Valentine’s menu is fully vegan, and rest assured that, even if your dinner date isn’t vegan, this meal is decadent, delicious enough to satisfy any kind of eater.
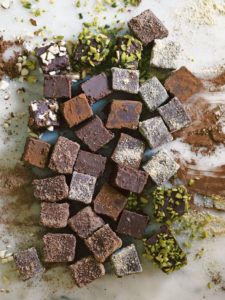
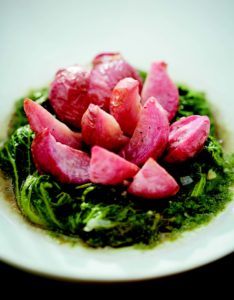
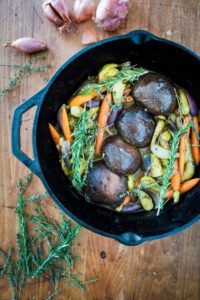
Let us walk you through it. The most important part of Valentine’s Day is the chocolate, but who isn’t tired of those heart-shaped boxes that look cuter than they taste? This year, you’ll make your own. Prepare these Salted Chocolate and Almond Truffles from Good Veg and have them ready when your date walks in the door. They’re so beautiful and you can sample one or two with a glass of wine before you sit down. From there, start your meal with Vedge‘s Baby Scarlet Turnips and Their Greens with Garlic Jus. They’re pink and delicious–perfect for the occasion. Then you’ll want something show-stopping for your main dish: what better than a roast? This Pot-obello Roast from But My Family Would Never Eat Vegan! will stun even the biggest vegan-skeptic. For dessert, we’re back to Good Veg for a fruit and wine-centric recipe: Pears in Black Mulberry and Red Wine Sauce. Or, you could just dig back into those chocolates. You can’t go wrong either way.
Find all of those recipes below and Happy Vegan Valentine’s from all of us at The Experiment!
Ingredients
For the truffles
¼ cup (50 g) coconut oil
1 tablespoon coconut sugar or maple sugar
¾ cup (200 g) white almond butter
7 ounces (200 g) dark chocolate with 70 percent cocoa solids, chopped into small pieces
2 large pinches of sea salt flakes, scrunched up in your fingers
1 vanilla pod, split lengthwise, seeds scraped out, or 1 teaspoon vanilla bean paste
For the coating
Cocoa powder
Unsweetened desiccated coconut
Shelled and unsalted almonds, hazelnuts, pecans, pistachios and so on, finely chopped
1. Heat the coconut oil and sugar together in a saucepan set over low heat, stirring with a wooden spoon until the oil has melted and the sugar has dissolved. Add the almond butter, chocolate, a pinch of scrunched sea salt and all the vanilla seeds. Continue to stir gently until the chocolate is two-thirds melted. Remove from the heat and continue to stir intermittently until smooth and shiny.
2. To make square truffles, pour the mixture into an 8-inch (20 cm) square brownie pan lined with parchment paper. To make scoopable truffles, you can use a pan as above or a shallow bowl, about inches (20 cm) in diameter. Either way, set the truffle mix aside to cool, then scatter with the remaining scrunched sea salt. Chill for 2 hours, until set solid.
3. Transfer the coating ingredients you want to use into shallow bowls; the amount you’ll need will depend on how many different coatings you use in a batch, but make sure the bases of the bowls are covered generously to get an even covering.
4. To make square truffles, turn the mixture out onto a cool work surface and slice into small squares (the mixture is rich) then roll each gently in a coating. To scoop out curls, leave the mixture at room temperature for 15 minutes or so (this is a bit trial and error as weather and kitchen temperature vary so much), then scrape the surface with a teaspoon to scoop into curls and rough spirals. Roll each gently in a coating and keep cool or, if they feel soft, return them to the fridge to set the mixture up.
5. The coated truffles will last for 2 weeks or so if they are kept chilled in a sealed container. Or freeze them for a good month, defrosting in the fridge overnight when you need them.
Ingredients
1 pound baby scarlet turnips with their greens
2 tablespoons olive oil
2 teaspoons salt
2 teaspoons freshly ground black pepper
2 tablespoons minced garlic
1. Preheat the oven to 400°F. Bring a large pot of salted water to a boil over high heat and prepare an ice bath.
2. Chop the greens off the turnips, leaving about 1 inch of the stems intact. Chop the greens into 1-inch lengths. Set aside the greens.
3. In a medium bowl, toss the turnips with 1 tablespoon of the oil, 1 teaspoon of the salt, and 1 teaspoon of the pepper. Transfer to a sheet pan and roast until fork-tender, 6 to 8 minutes. Remove from the oven and set aside to cool.
4. Meanwhile, blanch the chopped greens in the boiling water for 2 minutes. Drain the greens, shock in the ice bath for 5 minutes, then drain thoroughly.
5. In a large sauté pan, heat the remaining 1 tablespoon oil just until it ripples. Add the garlic and cook, stirring, until it is light brown, 3 to 5 minutes. Remove from the heat, then deglaze the pan with ½ cup water. Add the blanched greens to the pan, return to the heat, and heat through, 2 to 3 minutes, making sure not to overcook them.
6. Transfer the greens and jus to a serving dish and arrange the roasted turnips on top. Serve immediately.
Ingredients
4 large portobello mushrooms
1 tablespoon olive oil
1 small red onion, quartered
6 shallots, trimmed and halved lengthwise
2 tablespoons brown rice flour (or other flour, gluten-free if necessary)
1⁄4 cup (60 ml) vegan red wine
2 tablespoons liquid aminos(or gluten-free tamari; use coconut aminos to be soy-free)
1 tablespoon vegan Worcestershire sauce (gluten-free and/or soy-free if necessary)
1 teaspoon dried parsley
1 teaspoon salt
1 teaspoon black pepper
1⁄2 teaspoon paprika
3 cups (720 ml) vegan low-sodium “no-beef” flavored broth(or regular vegetable broth)
1 tablespoon nutritional yeast
1 pound (455 g) small carrots, peeled (or baby carrots)
1 pound (455 g) fingerling potatoes, halved lengthwise
8 ounces (225 g) brussels sprouts, halved
4 thyme sprigs
2 rosemary sprigs
1. Remove the stems from the mushrooms and chop the stems into bite-size pieces. Set the stems and caps aside separately.
2. Preheat the oven to 400°F (200°C). Heat the oil in a large oven-safe pot or Dutch oven over medium heat. Add the onion and shallots and sauté for about 5 minutes, until softened. Add the flour and cook, stirring, until the flour is not visible, 1 to 2 minutes. Add the wine, liquid aminos, Worcestershire sauce, parsley, salt, pepper, and paprika and cook, stirring, for 2 to 3 minutes, until the mixture has thickened. Add the broth and stir in the nutritional yeast. Add the chopped mushroom stems, carrots, potatoes, and brussels sprouts and bring to a boil. Reduce the heat to a simmer and cook for about 5 minutes.
3. Remove from the heat. Arrange the portobello mushroom caps in the center of the pan, with vegetables surrounding and under them, and spoon sauce over the tops until well covered. Top with the thyme and rosemary sprigs. Cover the pot and place it in the oven. Roast for 15 minutes, then remove the lid and roast for another 5 minutes, uncovered. The mushrooms and vegetables should all be very tender. Remove from the oven.
4. You can serve straight from the pot, or arrange the portobello caps in the center of a platter surrounded by the vegetables and garnished with the herbs, and spoon the sauce over the top. Leftovers will keep in an airtight container in the fridge for 2 to 3 days.
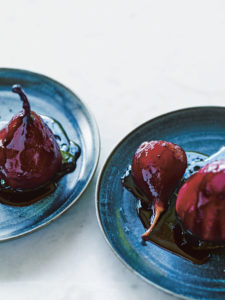
Ingredients
1 vanilla pod, split lengthwise, seeds scraped out
1 bottle of good, fruity red wine
⅔ cup (120 g) light muscovado sugar
14 ounces (about 1 ¼ dry pints/400 g) black mulberries or blackberries, fresh or frozen
6 firm pears, peeled but kept whole
1. Put the vanilla pod and seeds in a large saucepan with the wine, sugar and mulberries.
2. Cut a sliver from the base of each pear so that they sit upright. Poach the pears by gently simmering, covered, for 20 to 30 minutes, turning every now and then to make sure they are covered in the wine. They should be tender to the point of a knife, but not on the point of collapse.
3. Take the pears from the pan with a slotted spoon, setting them aside in a shallow bowl. Simmer the liquid in the pan to reduce it by half, rendering it syrupy and rich. Pass the sauce through a fine sieve, pressing to release all the juice from the berries. Serve each pear cloaked in the sauce.
Recipe from Good Veg: Ebullient Vegetables, Global Flavors—A Modern Vegetarian Cookbook © Alice Hart,2016, 2017. Photographs copyright © Emma Lee, 2016, 2017.
Recipe from Vedge: 100 Plates Large and Small That Redefine Vegetable Cooking, copyright © Rich Landau and Kate Jacoby, 2013.
Recipe from But My Family Would Never Eat Vegan!: 125 Recipes to Win Everyone Over © Kristy Turner, 2016.


